2.04 Mapping the Invisible: Iron Filings and Compasses
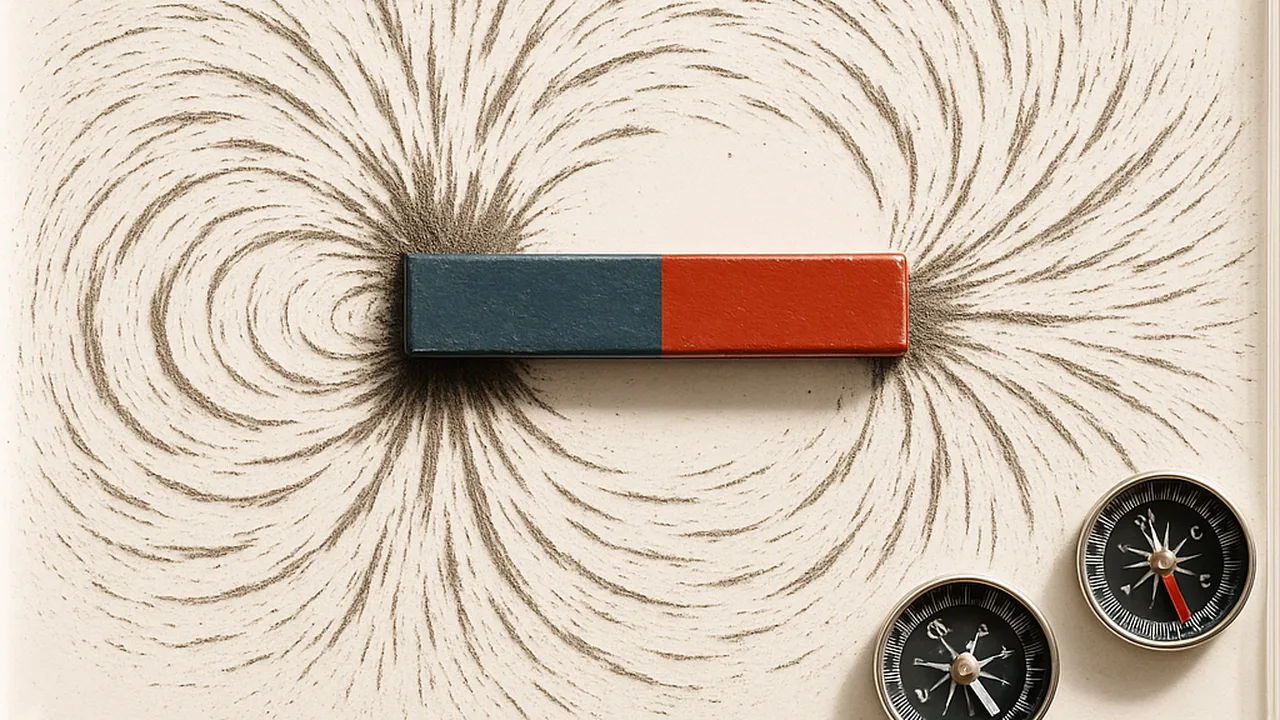
use iron filings and compasses to map a magnetic field and explain what the map shows about forces without contact.
- I can explain the purpose of the investigation, which is to show that fields exist between objects that exert forces on each other without being in contact.
- I can make and record observations about how objects move, stay suspended, or interact in simulations when electric or magnetic fields are involved.
- I can make and record observations about feeling a push or pull when holding an object affected by electric or magnetic forces.
Phase 2: Investigate
Warm-Up ~5 min
Do Now. Place a compass on your desk, far from any metal. Note where the needle points. Then slide a bar magnet slowly toward it from the side. Predict first.
What will the compass needle do as the magnet comes closer?
Instruction ~10 min
Explore first. Lay a sealed tray of iron filings over a bar magnet and tap it gently. Sketch the pattern. Then set a compass at each of eight spots around the magnet and draw an arrow for the needle. Repeat with two magnets, first with opposite ends facing, then with like ends facing.
| Setup | Sketch of filing pattern | Where filings are thickest | Compass arrows (sketch) | Push or pull between magnets? |
|---|---|---|---|---|
| One bar magnet | — | |||
| Two magnets, N facing S | ||||
| Two magnets, N facing N | ||||
| Magnet under a cardboard sheet | — |
Naming the idea. The region around a magnet where it can push or pull on other objects is its magnetic field. We cannot see the field, but filings and compasses respond to it. The curved lines they make are called field lines. Where lines bunch together, the field is stronger.
Worked example 1: reading a filing map. Priya’s filings crowded tightly at the two ends of the magnet and spread out far from it. That tells her the field is strongest at the poles and weaker with distance. Her paper-clip test agreed: clips stuck best at the ends.
Worked example 2: attract or repel? With north facing south, Malik’s filings made lines that bridged the gap between the magnets. With north facing north, the lines bent away and left an empty zone in the middle. The two maps match what his hands felt: a pull, then a push.
Why the plan works. We changed the distance, the orientation and the number of magnets. We used filings and compasses as detectors. Without a detector, we would have no way to show the field is there at all.
Guided Exercises ~15 min
Use your sketches and arrows to answer. Talk it over before you lock in.
Independent Practice ~10 min
Connect the field map to our sorting line.
Sketch a magnet above a moving belt with a steel can below it. Draw the field lines. Mark where the can would be pulled hardest and explain why.
How confident are you that you can I can map a magnetic field and explain what the map shows.
Closure ~5 min
Fields fill the space around magnets, and they are strongest near the poles. Next time, we build a magnet we can switch on and off.
Exit ticket: describe two observations from today that show a magnet acts on objects it is not touching. Say which tool gave each observation.
Teacher notes
Materials (per team): a sealed filing tray or filings in a zip bag taped flat, 2 bar magnets with labeled poles, 1–4 small compasses, a sheet of cardboard, paper clips.
Setup: seal filings before class; loose filings on a magnet are nearly impossible to clean. Keep compasses away from steel desk legs, which can throw off readings.
Listen for: “the lines are real strings of force.” Field lines are a model; filings form chains because each filing becomes a tiny magnet. Old magnets can have mislabeled or weakened poles; check with a compass. Stay qualitative (MS-PS2-5 boundary).
Support / stretch: give a template with the magnet outline and eight compass circles. Stretch: map a horseshoe or ring magnet and compare.