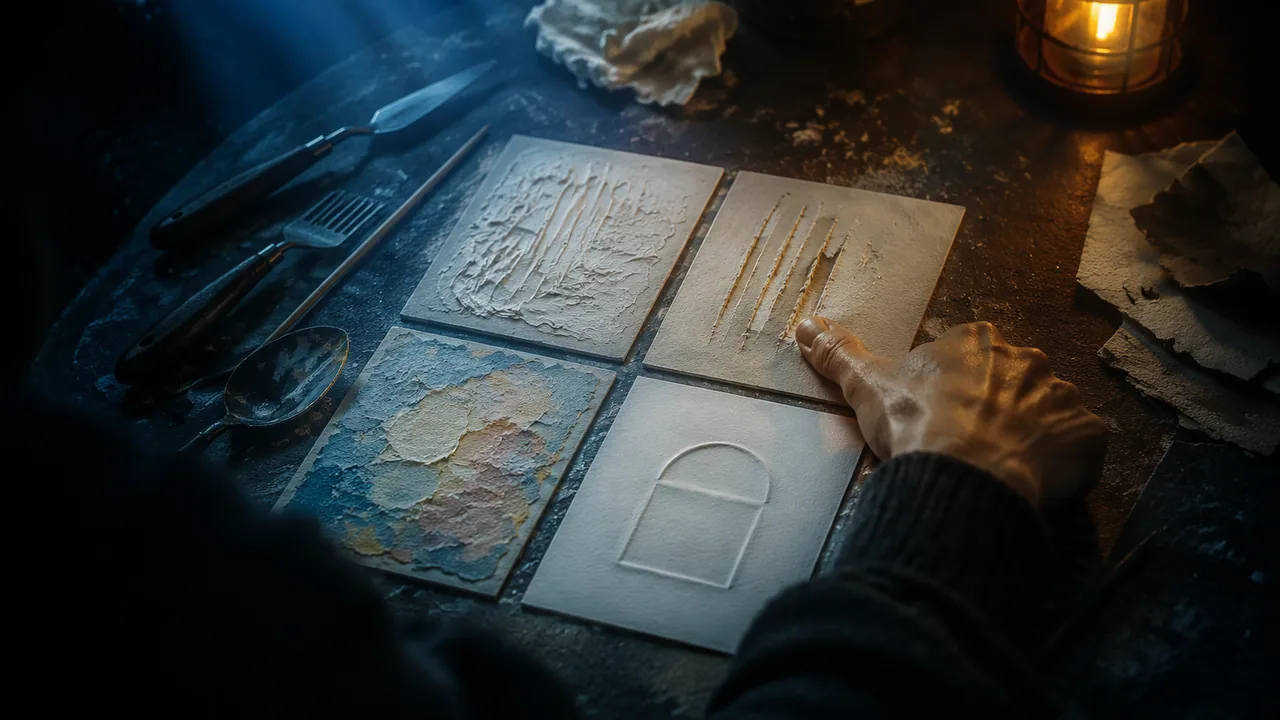
test four tactile surface techniques — impasto with modeling paste, sgraffito, oil-pastel build-up and blind embossing — handling each material safely and recording how the surfaces feel and wear.
Instruction
This lab tests four techniques that give paint and paper real texture. You will make one test card for each, then do something most students never do: a wear test, because a tactile work will be touched by many hands.
1. Impasto with modeling paste. Acrylic paint dries flat. Mix it about half and half with modeling paste (or with a heavy gel medium) and apply it with a palette knife, a stiff brush or a plastic card. Drag a comb or fork through it for ridges; stipple it for bumps. Thick layers take hours to dry and can crack if applied more than about 5 mm deep at once — build in layers. A low-cost substitute is acrylic paint mixed with clean fine sand, which dries gritty rather than ridged.
2. Sgraffito. From the Italian for “scratched”. Lay down one color, let it dry, cover it with a second, and scratch through the top layer with a wooden skewer or the end of a brush to reveal the first. With acrylic paste the scratches become grooves you can feel. Potters use the same technique through slip on clay.
3. Oil-pastel build-up. Oil pastels can be layered heavily and scraped back. They never fully dry, so they stay slightly soft and waxy — pleasant to touch but easily smeared. That trade-off is exactly what the wear test is for.
4. Blind embossing. Cut a simple shape from thick card and glue it to a backing: this is your plate. Lay slightly dampened heavy paper over it and rub firmly with the back of a spoon or a burnishing tool, working from the center out. The shape rises from the paper without any ink, as in the Japanese prints of Lesson 3.1. For a deeper line, draw on the back of the paper with a ballpoint pen over a soft surface (a mouse pad or a folded towel): the line rises on the front.
The wear test. When each card is dry, rub it firmly with your thumb twenty times and brush it with a dry cloth ten times. Record what changed: flaking, smearing, flattening, nothing. A texture that looks strong but fails the wear test is not suitable for work that invites touch unless it is sealed or placed where hands will not reach.
Health and environment. The arts standards ask you to explain how materials affect human health and the environment. Acrylic paint is water-based, but it is still plastic: wipe brushes on paper towel before rinsing, rinse in a jar rather than under a running tap, and let the paint solids settle and dry before throwing them away rather than pouring wash water down the drain. Choose materials carrying the ACMI AP (Approved Product) seal. We do not use solvents such as turpentine in this course.
📖 Read for this lesson
The reading opens over the lesson; close it to come back to exactly where you were. The checks below draw on it.
Studio: Four tactile surfaces and the wear test
Question. Which paint, pastel and paper techniques produce surfaces that can be read by touch and survive repeated handling?
Materials
- Four heavy card or canvas-board test cards about 12 × 12 cm
- Acrylic paint in two contrasting colors and acrylic modeling paste or heavy gel medium (or clean fine sand as a substitute)
- Plastic palette knives, old plastic cards, forks or combs and wooden skewers
- Oil pastels
- Heavy drawing paper, thick card scraps, PVA glue, a spoon and a ballpoint pen
- Rinse jars, paper towels and a soft cloth
- Use only water-based acrylics and ACMI AP-seal materials; no solvents or turpentine.
- Do not sand dried modeling paste indoors; if a surface must be smoothed, do it outdoors wearing a dust mask.
- Skewers: scratch away from your body and keep points down on the table.
- Wipe brushes and knives on paper towel before rinsing, and let rinse water settle so paint solids can be dried and put in the bin rather than poured down the drain.
- Wash hands after using oil pastels and paint; if your skin is sensitive, wear thin household gloves.
Procedure
- Card 1, impasto: mix acrylic and modeling paste about half and half and apply with a knife; comb one area and stipple another, no deeper than about 5 mm.
- Card 2, sgraffito: paint a dry base color, apply a second layer of paste-thickened paint, and scratch a pattern through it with a skewer while it is still soft.
- Card 3, oil pastel: build three or more heavy layers of oil pastel and scrape a pattern back with a card edge.
- Card 4, blind embossing: glue a card shape to a backing, lay dampened heavy paper over it and burnish firmly with a spoon; add a raised line drawn from the back with a ballpoint over a soft surface.
- When all cards are dry (next session), do the wear test: 20 firm thumb rubs and 10 cloth brushes on each.
- Record how each card feels before and after, and photograph each in raking light.
Data
| Card | Technique | Feel before (5 tactile scales) | Feel after wear test | Damage (none / slight / heavy) | Health or environment note |
|---|---|---|---|---|---|
| 1 | Impasto | ||||
| 2 | Sgraffito | ||||
| 3 | Oil pastel | ||||
| 4 | Blind embossing |
Analysis
- Rank the four cards from most to least durable under touch. What evidence from the wear test supports your ranking?
- Which technique gave the clearest difference between two areas by touch, and why?
- Which technique would suit a piece meant to be handled by many visitors, and which would suit a piece seen but not touched? Explain.
If you cannot do this studio in person: At home, use any washable acrylic or poster paint thickened with flour paste or PVA glue for impasto, crayons for layered build-up, and a cereal-box plate with printer paper for embossing. Do the same wear test and photograph each card.
Formative check
Work through these before moving on. They are not graded — they tell you whether the standard below has landed yet.
What is the best way to deal with acrylic rinse water in the studio?
Scratching through a top layer to reveal the layer beneath is called ; raising a design in paper with pressure and no ink is called blind .
Upload raking-light photos of your four cards and your data table. Which technique will you consider for your medium study, and what did the wear test teach you about it?
How confident are you that you can make tactile surfaces in paint and paper safely and judge how well they survive handling?
Four Surface Techniques: Recipes, a Fixed Wear Test and Sample Results
SLS original technique sheet with illustrative results · SLS original (recipes are starting points; results are illustrative)
Why this reading. The lab asks for four technique test cards, a wear test and a safety note for each material. This sheet gives the amounts, layer limits and drying times, a fixed wear-test protocol, and a form. The recipes are SLS studio starting points to be tested on a card first, not manufacturer specifications. The sample wear-test results are illustrative (SLS original) and reappear in Lesson 3.3.
Recipes, in the order of the lab
- Impasto: mix equal volumes of acrylic paint and modeling paste (for example 2 tablespoons of each); apply with a palette knife or plastic card. Build in layers no deeper than about 5 mm, and wait until a layer is dry to the touch and cool before the next (usually several hours; thick layers overnight). Sand alternative: 1 part clean fine sand to 3 parts paint, by volume, as a starting point.
- Sgraffito: a base coat of one color, dry; a second coat of a contrasting color, applied about 1 mm thick; scratch through with a skewer while the top coat is dry or just tacky.
- Oil-pastel build-up: three to five layers, pressing firmly; scrape back with the edge of a plastic card.
- Blind embossing: plate of card about 1.5 mm thick, glued flat; heavy paper (about 200 g/m²) dampened lightly with a sponge, not soaked; rub with the back of a spoon from the center out.
The wear test, exactly
Dry card. Rub 20 times with the thumb at firm pressure, then brush 10 times with a dry cloth. Score the surface 0 to 3 for damage (0 = nothing changed, 1 = slight smoothing, 2 = flaking or smearing you can see, 3 = a loss of the texture). Record what you see and what fell off.
Illustrative results (SLS original; use in Lesson 3.3)
| Technique | Damage (0–3) | What happened |
|---|---|---|
| Impasto with paste, unsealed | 1 | ridge tops slightly polished; nothing fell off |
| Paint and sand | 2 | loose grains on the cloth after the first brush |
| Sgraffito in paste | 1 | groove edges softened a little |
| Oil pastel | 3 | smeared onto the thumb and the cloth; texture flattened |
| Blind embossing | 2 | raised shape lost about half its height after damp handling |
| Air-dry clay tile (unsealed) | 2 | fine powder came off; one edge chipped |
Health and materials
Look for the ACMI AP (Approved Product) seal of the Art & Creative Materials Institute. Do not use turpentine or other solvents. Wipe brushes on paper towel before rinsing; rinse in a jar; let the solids settle and dry, then bin them. Keep clay dust down: wipe clay dust with a damp sponge, never sweep it dry.
Sources: Art & Creative Materials Institute, AP seal (acmiart.org)