render convincing form and surface in colored pencil by controlling layers, pressure, stroke size and burnishing.
Instruction
The record’s version of this unit brings in a visiting artist from the Colored Pencil Society of America to demonstrate rendering of forms, laying in lights and darks, size of pencil strokes, pressure of pencil and movement within the work. In this online course you work from this lab instead; if you also watch a recorded demonstration by a colored-pencil artist (with a parent’s permission for the site), compare what you see with each step here.
Colored pencil is a painting medium when you layer it. A single heavy layer of colored pencil looks like a coloring book: waxy, flat and with white paper specks. Colored-pencil painters build color from many light layers, each mixing optically with those below, until the paper’s tooth fills and the surface looks painted. Use good paper with some tooth (a smooth bristol or hot-press paper for detail, a slightly textured drawing paper for softer effects).
Pressure. Think of pressure on a scale from 1 (the lightest touch) to 5 (full burnishing). Almost all early layers are at 1-2. Heavy pressure early flattens the paper’s tooth and prevents further layering. Save pressure for the end.
Stroke size and direction. Small, overlapping circular strokes (sometimes called scumbling) give smooth, even tone. Short parallel strokes that follow the form’s contour help describe its shape. Long directional strokes can describe wood grain or fabric. Keep the pencil sharp for detail and slightly blunt for broad areas. Mixed stroke directions within one area produce a soft blur; consistent directions give crisp texture.
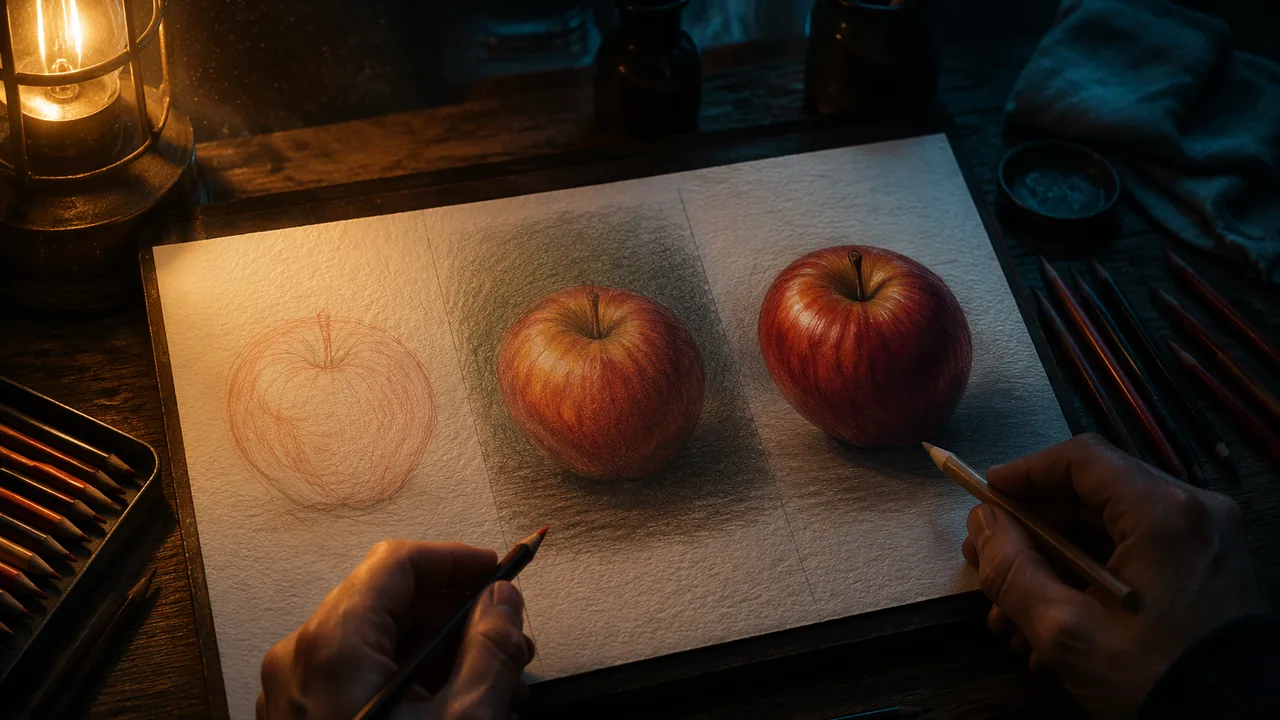
Value underpainting. Many colored-pencil painters lay a first layer in a neutral or complementary color to establish values before adding local color. For a red apple, a light layer of dark green or indigo in the shadows makes the later red richer and deeper than black would. This is a version of the old-master grisaille or underpainting.
Laying in lights and darks. Plan the whites first; colored pencil is transparent, so the lightest areas are paper, left untouched or given only a pale tint. You can impress lines into the paper with a blunt stylus before coloring, and pencil will skip over them, leaving fine white lines for highlights, whiskers or wood grain. Build darks by layering complementary colors and dark blues or browns, not by pressing black hard, which looks dead.
Burnishing. In the final stage, press hard with a colorless blender pencil or a white or light pencil to fuse the layers into a smooth, saturated surface. Burnish only where you want smoothness, such as polished metal, glass or the glossy skin of fruit. Leave matte surfaces unburnished. After burnishing, only a little more color will go on.
Solvent-free. Some colored-pencil artists blend with odorless mineral spirits. This course does not use solvents at home. A colorless blender pencil, a paper stump or a soft brush does the job without fumes.
A worked example: a paper curl. A pinned note curling away from a wooden board is a trompe l’oeil favorite. Lay in the board’s wood grain with long directional strokes of light ochre, burnt sienna and dark brown at pressure 1-2. Leave the note as paper white. Along the curl, add a pale gray-blue halftone where the paper turns away from the light, and a thin, sharp line of shadow on the board just under the curl’s edge, darkest where the paper nearly touches. The curl’s shadow does most of the work; without it, the note looks painted on.
📖 Read for this lesson
The reading opens over the lesson; close it to come back to exactly where you were. The checks below draw on it.
Studio: Rendering form, surface and a paper curl in colored pencil
Question. How can layering, pressure, stroke direction and burnishing turn colored pencil into a painting medium that convincingly renders form and surface?
Materials
- Artist-grade colored pencils (a basic set of 24 or more; soft wax-based pencils layer best)
- Colorless blender pencil, paper stump, and a blunt stylus or an empty ballpoint pen
- Smooth bristol or hot-press paper and a sheet of medium-tooth drawing paper
- A small sphere (an apple, orange or ball), a piece of wood and a sheet of paper, lit by a single lamp
- Enclosed pencil sharpener and a scrap sheet to rest your hand on
- Use an enclosed sharpener; do not sharpen with a blade toward yourself, and dispose of shavings in the bin.
- No solvents (mineral spirits, turpentine) are used; blend only with a colorless blender or stump.
- Take a short break every 20 minutes to rest your hand and eyes, and keep your wrist in a neutral position; burnishing puts strain on the hand.
Procedure
- Make a pressure scale of one color at pressures 1 to 5, then a three-color layered swatch (for example yellow, red, blue) at pressure 1-2, and compare it with a single heavy layer.
- Burnish half of the layered swatch with the colorless blender and half with a white pencil; note the difference.
- Impress three lines into the paper with the stylus, then color over them to see the white lines appear.
- Render the sphere under one light: underpaint the shadow side in a complementary color, build local color in layers, leave the highlight as paper, and add a sharp cast shadow.
- Render a small area of wood grain with long directional strokes in at least three colors.
- Pin a curled strip of paper to the wood, and render the curl and its cast shadow on the grain, as in the worked example.
Data
| Test | Observation | Use in your project? |
|---|---|---|
| Single heavy layer vs three light layers | ||
| Colorless blender vs white burnish | ||
| Impressed lines | ||
| Complementary underpainting in shadow | ||
| Paper curl shadow |
Analysis
- Compare the single heavy layer with the three light layers. Which looks more like paint, and why?
- What made your paper curl convincing, or unconvincing? Test it from six feet away and from arm’s length.
- Which technique will matter most in your trompe l’oeil painting, and where will you use it?
If you cannot do this studio in person: Low-cost version: the same tests can be done with a smaller set of colored pencils (12 is workable) on any heavy paper. Use a bent paperclip end as a stylus and a white pencil for burnishing. Photograph the sheet for submission.
Formative check
Work through these before moving on. They are not graded — they tell you whether the standard below has landed yet.
You press hard with your first layer of color. What will happen when you try to add the second and third layers?
What is the best way to get a rich dark shadow on a red apple in colored pencil?
Pressing a line into the paper with a blunt stylus before coloring leaves a white line because the pencil over the groove.
How confident are you that you can layer, vary pressure and stroke, and burnish colored pencil to render form and surface?
Practice
Work these on paper or in your notebook, then open Check your answer. Aim for all of Fluency and Application; try at least one Challenge.
Printable version: this unit’s practice workbook (PDF)
Fluency
Build speed and accuracy with the core skill.
- Describe the pressure scale from 1 to 5. At which pressures are almost all early layers made, and why?
Check your answer
Answer: 1 is the lightest touch and 5 is full burnishing. Early layers are at 1-2, because heavy pressure early flattens the paper’s tooth and prevents further layering.Save pressure for the end. - Define tooth, scumbling, underpainting and local color.
Check your answer
Answer: Tooth: the paper’s texture that grips pigment and fills as layers build. Scumbling: small overlapping circular strokes for smooth, even tone. Underpainting: a first layer establishing values, often in a neutral or complementary color, beneath the local color. Local color: an object’s actual surface color, apart from the effects of light and shadow.Glossary terms from the lab. - Why does the course not use odorless mineral spirits, and what blends instead?
Check your answer
Answer: The course does not use solvents at home (no fumes). A colorless blender pencil, a paper stump or a soft brush blends without fumes.Safety also includes an enclosed sharpener and a break every 20 minutes for the hand and eyes.
Application
Use the skill in context. Show your reasoning.
- Plan the shadow of a red apple in colored pencil. Why does the lab advise against pressing black hard?
Check your answer
Answer: Underpaint the shadow side lightly in a complementary dark green or indigo, then layer the red over and within it, building darks with complements and dark blues or browns. Black pressed hard looks dead; complements make the red richer and deeper.This is a version of the old-master grisaille or underpainting. - You need fine white whiskers on a cat in a colored-pencil drawing. Explain the impressed-line technique and when in the process you must do it.
Check your answer
Answer: Before coloring, press the whisker lines into the bare paper with a blunt stylus (or an empty ballpoint). When you color over them, the pencil skips over the grooves, leaving fine white lines. It must be done first, while the paper is bare.Colored pencil is transparent, so whites are planned as paper, not added later. - Where should you burnish and where not? Give two examples of each.
Check your answer
Answer: Burnish where you want smoothness and saturation: polished metal, glass, glossy fruit skin (or a key, a laminated ticket). Leave matte surfaces unburnished: wood grain, paper, cloth. After burnishing, only a little more color will go on.Burnishing is done in the final stage with a colorless blender or a white or light pencil. - The lab kit’s paper curl lifts 1/2 inch at its far end, with the lamp 40 degrees off the board’s normal. Using shadow offset = height x tan 40 deg (tan 40 deg = 0.84), how far does the shadow shift at the far end, and at the pin?
Check your answer
Answer: About 0.42 inch at the far end; 0 at the pin.0.5 x 0.84 = 0.42 inch. At the pin the height is 0, so 0 x 0.84 = 0. The shadow is a wedge that widens toward the curl’s free end.
Review
Keep earlier skills sharp.
- Review (Lesson 1.1): which of the five trompe l’oeil strategies does the paper-curl exercise practice most, and what happens if you leave that element out?
Check your answer
Answer: Cast shadows (with flat objects and surface detail). The curl’s thin, sharp shadow on the board does most of the work; without it, the note looks painted on.The shadow is darkest where the paper nearly touches the board.
Colored-Pencil Lab Sheet: Pressure Scale, Layer Plan, a Sphere with Measurements and a Paper Curl
SLS original lab reference sheet; all dimensions and values set or computed by SLS · SLS original
Why this reading. The lab has you test layering, pressure, burnishing and impressed lines, then render a sphere, wood and a paper curl. This sheet gives the layout of each test, what result to expect so you can tell whether your test worked, and the measurements for the sphere and curl. Values are approximate for a soft wax-based pencil on smooth bristol; measure yours by taking a grayscale photo.
1. The pressure scale
| Pressure | Feel | Result (approximate darkness of one layer) | Use |
|---|---|---|---|
| 1 | The weight of the pencil alone | 10–15 percent; paper tooth fully visible | First layers and lights |
| 2 | Light hand | 20–30 percent | Building layers |
| 3 | Firm | 35–50 percent; tooth partly filled | Midtones |
| 4 | Heavy | 55–70 percent; shiny | Late layers only |
| 5 | Full burnish | Waxy, tooth filled | Last step on glossy areas |
Draw five boxes 1 in. × 2 in. in a row, one per pressure, in one color. Below them, a 2 × 2-in. swatch in three layers (yellow, red, blue) at pressure 1–2, and next to it a 2 × 2-in. swatch of a single heavy layer. Expected result: the three-layer swatch looks deeper and slightly glowing; the single layer looks waxy with white specks. Burnish the left half of the three-layer swatch with a colorless blender and the right half with white: the blender gives a darker, richer color; white lightens and softens it.
2. Impressed lines
With a blunt stylus press three lines 2 in. long into bare paper: light, medium and firm. Shade over them at pressure 1–2. Expected result: the firm line stays white; the light line is faint. Use the firm one for string, whiskers and paper edges.
3. The sphere: a worked plan
Draw a circle 3 in. in diameter. Put a lamp at the upper left. On a sphere lit from one side, the regions fall in a fixed order from light to dark:
| Region | Where (circle 3 in. across) | Color and pressure |
|---|---|---|
| Highlight | A small oval about 0.4 in. across, up and left of center, at about one third of the radius from the center toward the light | Bare paper |
| Light side | Most of the upper left half | Local color, 2 layers at pressure 1–2 |
| Midtone | A band across the center | Local color, 4 layers at pressure 2 |
| Core shadow | A crescent about 0.6 in. wide, lower right, set slightly in from the edge | Complementary underpainting plus local color plus a dark blue, 5 to 6 layers, pressure 2–3 |
| Reflected light | A thin lighter band, about 0.2 in. wide, along the lower-right edge, just outside the core shadow | Local color at pressure 1–2; lighter than the core shadow but darker than the midtone |
| Cast shadow | An ellipse on the table extending to the lower right about 4 in. long and 1 in. wide, darkest (as dark as the core shadow or darker) right where the sphere touches | Complementary darks, 5 layers, pressure 2–3; edge sharp at contact and softer farther away |
Underpaint the shadow side in the complement of the local color (green under an orange, violet under a yellow) before adding color. Check: a grayscale photo should show a smooth step from the light side to the core shadow, a slight lift at the reflected light, and the darkest darks at the contact point.
4. Wood grain
A 3 × 5-in. rectangle. First layer: light ochre, long strokes 2–4 in. along the grain, pressure 1. Second: burnt sienna in thinner streaks, spaced 1/8 to 1/4 in. apart. Third: dark brown in a few fine lines, sometimes forming a knot. Impress two or three grain lines before you start. Expected result: lines follow one direction with small waves, not perfectly parallel.
5. The paper curl and its shadow
Cut a strip 1 in. wide and 4 in. long. Pin it at one end and let the other end curl away from the wood by about 1/2 in. With the lamp about 40 degrees off the board’s normal, the shadow shifts sideways by height × tan 40° = 0.5 × 0.84 = about 0.42 in. at the far end and nothing at the pin. Render: shadow first as a wedge that widens from 0 to 0.4 in.; then a pale gray-blue halftone where the paper turns; leave the paper white otherwise. Check: the shadow is darkest at contact and widest and softest at the lifting corner.
6. Six-foot and arm’s-length check
From six feet the curl reads because of the shadow; up close it convinces because of the grain. If it fails from six feet, darken and sharpen the shadow.