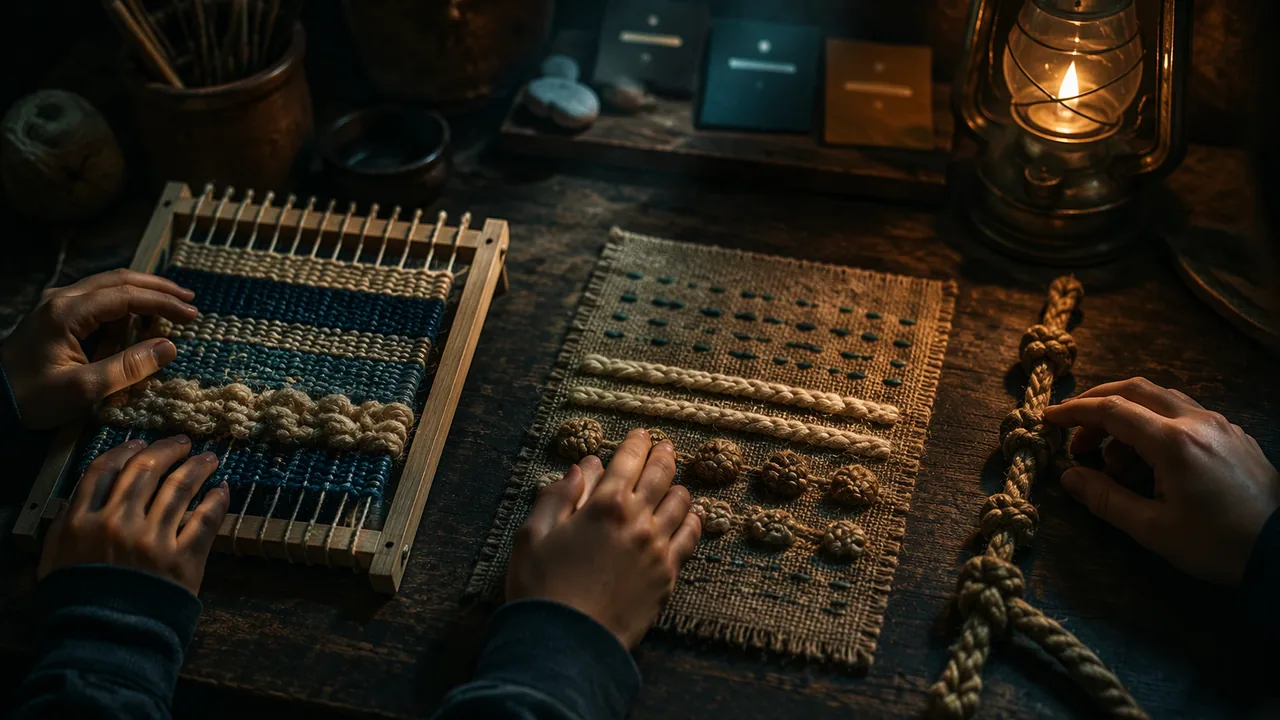
weave on a cardboard loom, stitch a small sampler and knot a cord, producing at least three distinct rhythms that can be told apart by touch.
Instruction
This lab gives you three fiber techniques and asks one question of each: what rhythm can it make, and can a hand feel it?
1. Cardboard loom weaving. Cut notches every 5 mm along the top and bottom edges of a piece of stiff card about 15 × 20 cm. Wind cotton string around the card through the notches to make the warp — keep the tension even. Weave the weft with a blunt tapestry needle or a flat card “shuttle”. Start with plain weave (over one, under one), pressing each row down with a comb. Then try three rhythm changes: stripes (change color every few rows — a regular rhythm), twill (over two, under two, stepping one warp each row, which makes diagonal ribs you can feel), and loops (wrap the weft around a pencil between warps, then slide the pencil out, leaving a raised pile). Leave the weft slightly slack at the edges; pulling it tight makes the weaving narrow toward the middle.
2. Stitched sampler. On burlap or loose-weave fabric stretched in a hoop or taped to card, stitch rows of: running stitch (in and out at equal spacing), back stitch (a continuous line, each stitch going back to meet the last), couching (a thick yarn laid on the surface and tied down with small stitches — very tactile), and French knots or simple wrapped knots for raised points. Vary spacing in one row to feel a progressive rhythm.
3. Knotted cord. Tie overhand knots along a cord at spacings you choose: regular, alternating (single knot, double knot), progressive (closer and closer). The Inka khipu recorded numbers with knot types and positions; your cord records a rhythm. With eyes closed, you, or a family member who has not seen it, should be able to count and describe it.
Feel, then look. For each technique, first explore your finished sample with eyes closed. Can you feel the difference between plain weave and twill? Between regular and progressive spacing? Rhythm in fiber is felt as change: a ridge, a gap, a bump, a switch of direction. A rhythm that is visible only as color disappears under the fingers.
Materials and sustainability. Use yarn ends, old T-shirts cut into strips, and fabric scraps where you can. Fiber work produces little waste if you keep offcuts for later collage. Wool can irritate some skin; cotton and acrylic yarns are alternatives.
Documentation. Label each sample with the technique and rhythm. Photograph them flat and in raking light. You will choose from these techniques for your portfolio work.
📖 Read for this lesson
The reading opens over the lesson; close it to come back to exactly where you were. The checks below draw on it.
Studio: Three fiber rhythms
Question. Which fiber techniques create rhythms that can be felt, and how do changes in structure, spacing and texture register under the fingers?
Materials
- Stiff card about 15 × 20 cm for a loom, a ruler and scissors
- Cotton string for warp; yarn, fabric strips and T-shirt strips for weft
- Blunt plastic or metal tapestry needles (large eye, no sharp point) and a pincushion
- Burlap or loose-weave fabric, an embroidery hoop or masking tape and card
- Thick yarn for couching and thin embroidery thread
- A pencil, a wide-tooth comb and a length of cord about 1 m
- Use blunt tapestry needles only; count needles out and back in at the end of each session and store them in a pincushion.
- Cut yarn with scissors, not by biting or snapping; pass scissors handle first.
- Keep long yarn ends off the floor and away from walkways to prevent tripping.
- If you are allergic to wool or other fibers, substitute cotton or acrylic yarn.
Procedure
- Notch the card loom every 5 mm top and bottom and wind the warp with even tension.
- Weave 2 cm of plain weave, then 2 cm each of color stripes, twill and loops, pressing rows down with the comb.
- On the burlap, stitch one row each of running stitch, back stitch, couching and knots, with one row whose spacing grows progressively wider.
- Tie a knotted cord with three sections: regular, alternating and progressive spacing.
- With eyes closed, explore each sample and record which rhythm changes you can feel. A day later, mix the samples up in a bag and test them again by touch alone; if a family member is willing, have them try too, without being told what to expect.
- Label and photograph each sample flat and in raking light.
Data
| Sample | Section | Rhythm type | Felt by you? (yes / partly / no) | Felt on the second test (you a day later, or a family member)? | What the fingers noticed |
|---|---|---|---|---|---|
| Weaving | Plain / stripes / twill / loops | ||||
| Sampler | Running / back / couching / knots / progressive row | ||||
| Cord | Regular / alternating / progressive |
Analysis
- Which rhythm change was easiest to feel and which disappeared under the fingers? What structural difference explains it?
- Compare your color stripes with your twill section: what does this show about designing rhythm for touch rather than sight?
- Which technique would you choose to show a rhythm that speeds up (progressive), and why?
If you cannot do this studio in person: No-cost version: a cereal-box loom and any string or yarn will work; stitch on an old dish towel or burlap sack with a large blunt needle, and knot any cord or shoelace. A family member can do the second test.
Formative check
Work through these before moving on. They are not graded — they tell you whether the standard below has landed yet.
Which weaving change is easiest to feel with eyes closed?
Counting needles out and back in at each session is a studio safety practice.
Upload raking-light photos of your three samples and your rhythm table. Name the technique you are most likely to use in your portfolio work and the rhythm you want it to carry.
How confident are you that you can make fiber rhythms that can be felt as well as seen?
Weaving, Stitching and Knotting: A Technique Sheet With Measurements, Drafts and a Worked Feel-Test Record
SLS original technique sheet and constructed record, illustrative; spacings are guidance for a 15 x 20 cm card loom · SLS original (technique sheet and constructed record, illustrative)
Why this reading. The lab tells you what to make and to test it by touch, but a good sample depends on measurements: how many warps the card holds, how far apart to space stitches and knots, and how to record what fingers find. This is the technique sheet. It is SLS original; numbers marked “about” are guidance for a 15 × 20 cm card, so check them against your own materials.
1. Card loom
A notch every 5 mm along a 15 cm edge gives about 28–30 notches, so about 28 warps (14 cm of weaving) and 2 warps per cm. Wind the warp so each string lies in one notch top and bottom, and keep it snug but not tight. Leave about 1.5 cm at each end for tying off, so the weaving height is about 17 cm. Four samples of 2 cm each, at about 4 rows per cm (8 rows per 2 cm), take about 32 rows and 8 cm of the loom, leaving space to spare.
Plain weave  (over 1, under 1)      Twill  (over 2, under 2, step 1)
row 1   O U O U O U O U             row 1   O O U U O O U U
row 2   U O U O U O U O             row 2   U O O U U O O U
                                    row 3   U U O O U U O O
                                    row 4   O U U O O U U O
Stripes: change color every 4 rows (about 1 cm): a regular rhythm you can see but hardly feel. Twill: diagonal ribs you can feel. Loops: wrap the weft around a pencil (about 7 mm across) between warps, then slide the pencil out; the loops stand about 7 mm high. Keep the weft slightly slack at the edges so the weaving does not pull in.
2. Stitched sampler
| Stitch | Spacing | Feel |
|---|---|---|
| Running stitch | 8 mm stitch, 8 mm gap | Almost flat, a faint dotted line |
| Back stitch | 8 mm, no gap | A continuous slightly raised line |
| Couching | Thick yarn laid on the surface, tied down every 1 cm | A strong raised ridge |
| French knot | Every 2 cm | A single bump |
| Progressive row | Gaps grow 5, 7, 9, 11, 13 mm (+2 mm each time) | The spacing opens out under a fingertip |
3. Knotted cord (about 1 m)
Leave 10 cm at each end. Section 1, regular: an overhand knot every 5 cm, four knots (20 cm). Section 2, alternating: a single knot, then a double knot, every 5 cm, four in all (20 cm). Section 3, progressive: gaps of 8, 6, 4 and 2 cm (20 cm). Leave 5 cm between sections. The total is 20 + 20 + 20 + 10 + 20 = 90 cm, which fits in 1 m. Progressive spacing feels like acceleration: the knots crowd together.
4. The feel test and the record
Explore each finished sample with eyes closed. A day later, mix the samples up in a bag and test them again by touch alone, so memory helps you less. If a family member is willing, ask them, told nothing about what is there, to do the same. Record yes, partly or no for each rhythm, in words. A worked record (SLS invented):
| Sample | Section | Rhythm | You, first test? | Second test (a family member)? | What the fingers noticed |
|---|---|---|---|---|---|
| Weaving | Stripes | Regular | no | no | Nothing; the ground felt even |
| Weaving | Twill | Regular, diagonal | yes | partly | Ribs that lean; second tester said “slanted lines” |
| Weaving | Loops | Regular | yes | yes | Loops felt as a fringe |
| Cord | Progressive | Progressive | yes | partly | Knots crowd; second tester counted six, there are five |
Reading it. The color-only section disappeared under the fingers; every felt rhythm was a structural change: ribs, loops or knots. That is the answer to “designing for touch rather than sight”: change the structure, not only the color. Test your own the same way, then choose the technique for your portfolio work and the rhythm you want it to carry.